A customer walks into your shop, visibly stressed after a fender bender. His insurance company needs an estimate ASAP, and he’s already late for work.
You grab a notepad and start listing the damages. As you fumble through pricing and part availability, the customer grows impatient.
After waiting for what feels like FOREVER, he leaves with an estimate, unimpressed and uncertain if it’s accurate.
Now, imagine you had an auto repair estimate software. With a few clicks, you could have instantly pulled vehicle data, labor costs, part prices, and more to generate a precise estimate in minutes.
How? Let’s get into that!
4 Steps To Create Estimates with Auto Repair Estimate Software
Creating accurate estimates quickly is crucial for any auto repair shop. With Torque360, you can streamline this process in just four simple steps. Let’s break it down:
Step 1: Adding a Vehicle
In Torque360, you can add vehicles using the VIN and license plate or manually enter the details. In this example, we’ll use the Vehicle Identification Number (VIN).
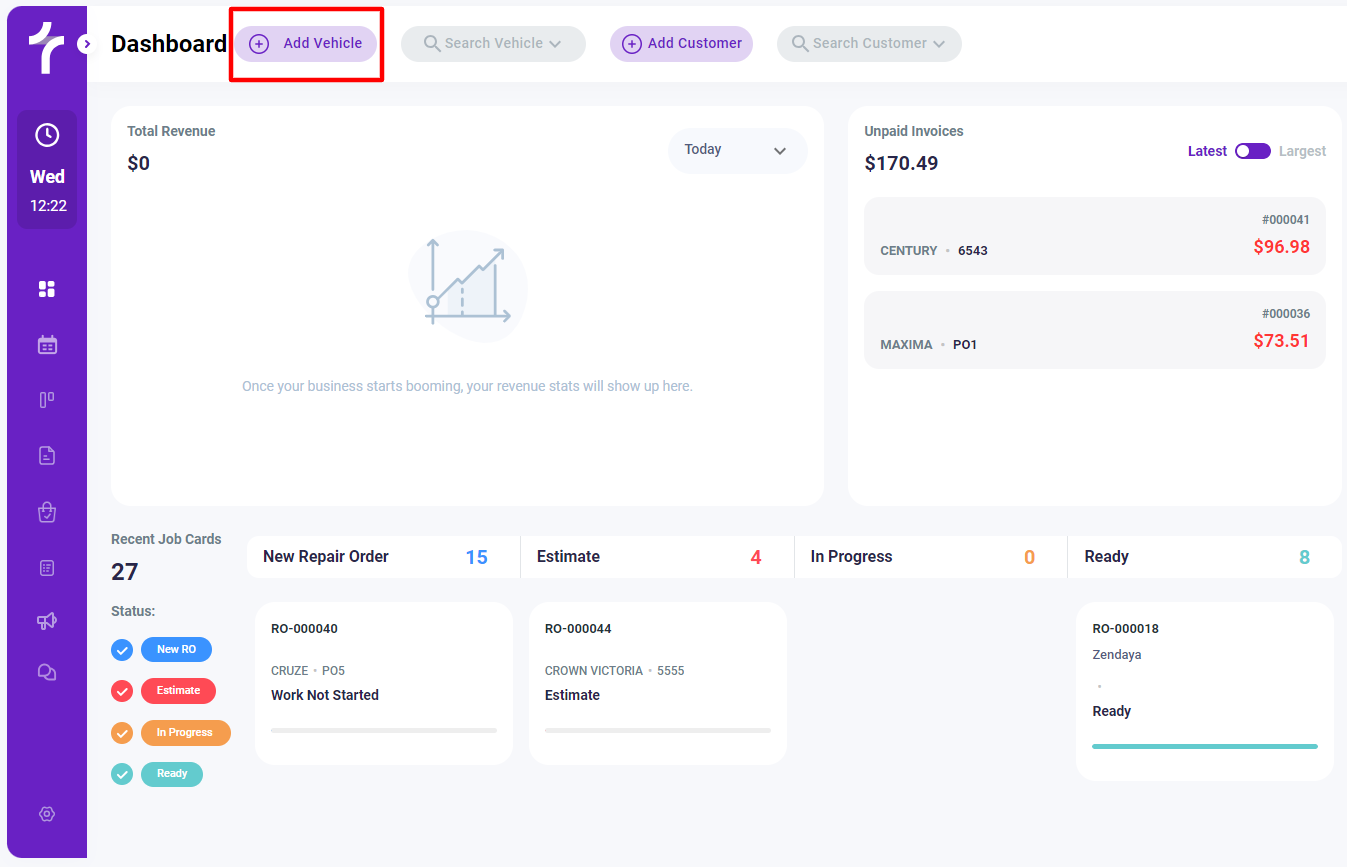
From the Dashboard
The first thing you have to do is sign in to the software. You will land on the “Dashboard”. Click “Add Vehicle” at the top.
Enter the Vehicle Identification Number (VIN) to search for the vehicle. Click on the search icon (🔍) right next to the field.
The results will show up against the VIN. Choose the correct vehicle from the list.

When you select the vehicle, these fields will fill in automatically:
- Vehicle Make
- Vehicle Model
- Year
- Engine Size
Enter the “License Plate” manually, as it is unique for all vehicles. Once all required fields are completed, the “Estimate” button will be enabled and become orange.
That’s how easy it is to add a vehicle using the VIN and start creating an estimate without manually entering all the details.
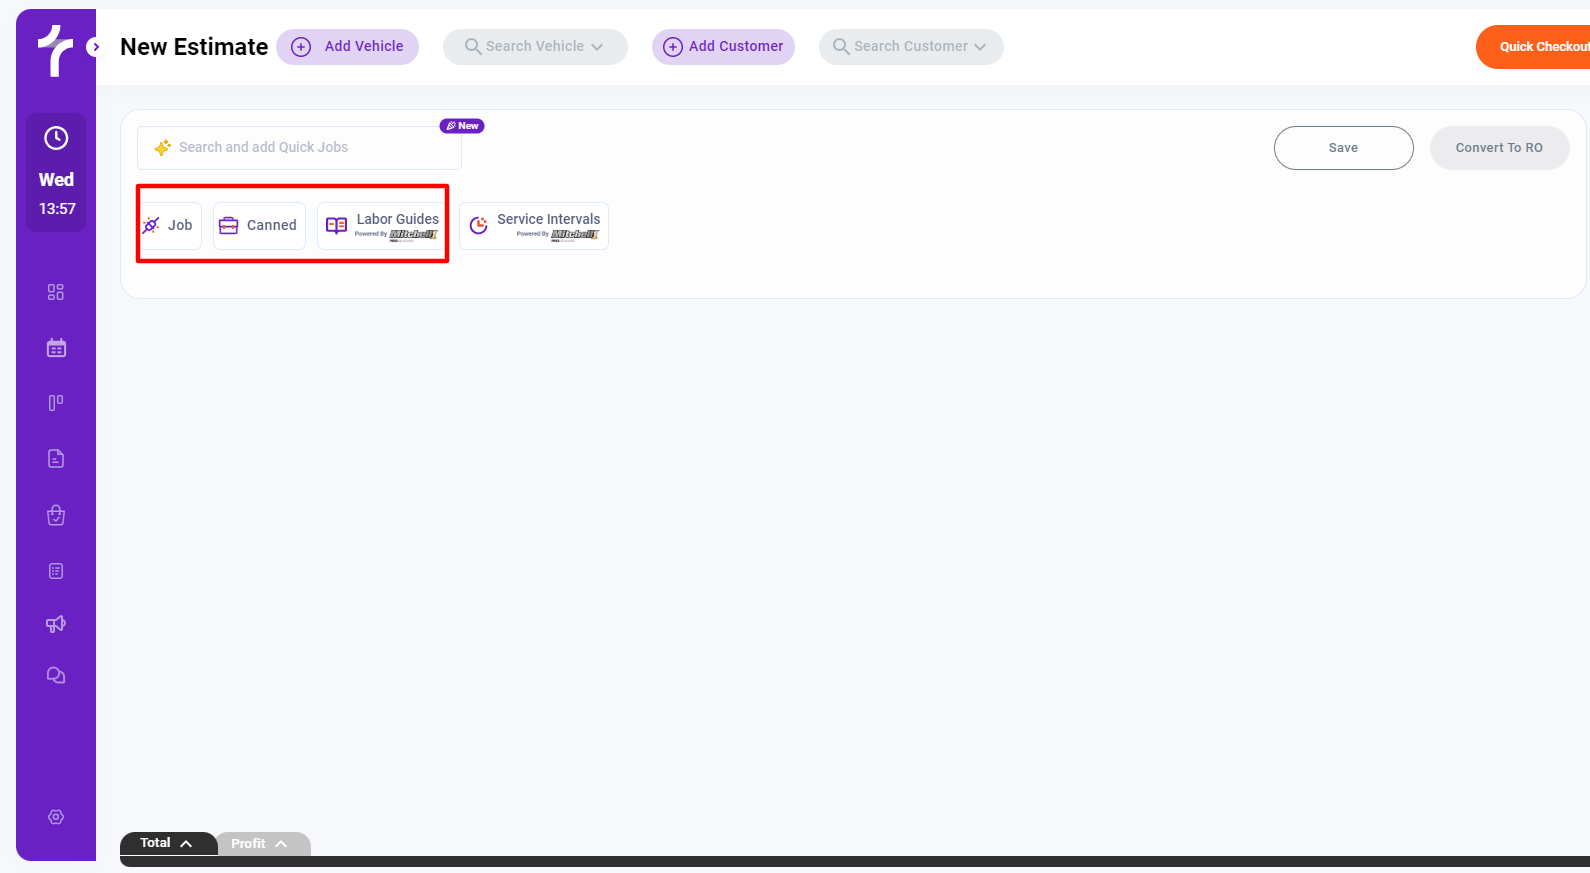
Step 2: Adding Jobs
You will land on the “New Estimate” page as you click the estimate. Here, you can add required jobs to be performed on a vehicle. You can add jobs using three methods:
- Manual entry
- Canned jobs
- Integrated labor guides
Method 1: Adding a Job Manually
Adding a job manually is easy. You just have to add the job title, select a mechanic, and add labor, parts and supplies, and miscellaneous costs.

Method 2: Canned Jobs
If customers frequently come in for specific jobs, you can save them as canned jobs. This way, you do not have to enter the details all over again.
Select a canned job (if you have saved one), and it will automatically be added to the estimate.
Method 3: Labor Guide
When you click on the labor guide, you will be asked, “Proceeding to Epicor will save the Estimate here.” Click on “Yes” to proceed. You will be navigated to Labor Guides search powered by Epicor.
You can search for the job through code or description under “Job Search.” Or you can click on the arrows next to categories to pick from predefined options.

When you select the required jobs, you will be asked, “Please Select an Option to Proceed.” Choose the desired option and click “Next” at the bottom of the page.
The next page will show you the selected jobs. Click the arrows next to parts and labor to select the relevant ones.
The “Add Estimate” button will be enabled as soon as you do this. Clicking on the button will add the job to the new estimate screen.
Method 4: Quick Jobs
There is an even a quicker way to add jobs. Type a word or phrase like “brakes” or “oil change,” and instantly, all related jobs from the Epicor Labor Guide will appear. Select and add them to your estimate with a click, saving even more time.

Step 3: Ordering Parts with Integrations
There are two integrations in the automotive repair estimate software for ordering parts and supplies. You can order parts from:
- Nexpart
- PartsTech
Let’s see how these integrations help you order parts and create quick and accurate estimates.

Method 1: Adding Parts with Nexpart
When you click on Nexpart, you will be asked to “Select Nexpart Account to Use.” You can click on the already integrated account. Or you can “Connect Another Account”.
Here, you can effortlessly search for the required parts using filters. You can add “Parts & Accessories” or “Labor.” Moreover, you can search for the part manually by typing it in the “Part Search” field.

You can also select from the pre-defined options below “Find More Parts.” Click on any of these, and the relevant parts will appear. You can also select these categories.
Select a quantity and click the “Cart” button. The chosen parts will be added to the cart. Once you have added all the relevant parts, click on the cart (🛒) icon at the top right corner of the page.
If you wish to purchase the required parts, click the “Place Order” button in green. If you only want to add these parts to the automotive estimating software, click “Back to Torque.” The selected parts will automatically be added.
Method 2: Adding Parts with PartsTech
Similarly, you can add the parts from another integration, PartsTech. You can search for parts in the search bar, select a vehicle to search for vehicle-related parts only, and choose from popular parts or categories.

You can compare prices for different suppliers and choose the required parts. Click on “Add to Cart,” then click on the cart (🛒) icon at the top right corner of the page.
Once done, you have two options. If you wish to purchase the part, click “Buy Now.” If you want the cost reflected in the estimate, click “Submit Quote.”
The PartsTech window will close, and you will be returned to the software. The part cost and other details should be added to the automotive repair estimator.
Step 4: Customer Approval
Once the estimate is finalized, click “Convert to RO” to convert it to a repair order. You will be taken to the “Repair Order” screen.

There are two methods to get customer approval for the estimate.
- If a customer is not physically present in your shop, you can share the estimate via SMS or email. The customer will receive a detailed estimate and approve it.
- If a customer is physically present in your shop, you can manually approve the job and start working on the vehicle.
Let’s see how this feature works!
Method 1: Digital Authorization
Click on the “Digital Authorization” button. Select the method for sharing the estimate with the customer. It can be via SMS, email, or both. Enter the required details and click “Send.”

The customer will receive an SMS or email with a link. When the customer clicks on that link, he is taken to the detailed repair order. From there, the customer can verify it; once satisfied, he has to authorize it.
Method 2: Manual Authorization
Manual authorization is done on the spot. Show the estimate to the customer and request his approval for all the jobs. You will find options next to each job. Choose from:
- Approve
- Decline
- No Action

And voila! You’ve created an estimate using automotive repair estimate software in four simple steps. Send it to your customer and get the work started!
Check out the Top 5 Auto Repair Estimate Software in 2024 to streamline your shop’s estimating process!
Frequently Asked Questions
How does the estimate software benefit your shop?
The software benefits your shop by streamlining the estimation process, reducing errors, improving efficiency, and enhancing customer satisfaction through timely and precise estimates.
How can you integrate your existing systems with the software?
Torque360 offers integration options with various platforms for ordering parts and accessing labor guides. You can typically connect to accounts like Nexpart and PartsTech directly within the software.
Is it difficult to train staff on using the estimator software?
No, the software is user-friendly and designed with intuitive interfaces. Training can usually be completed in a short period with support and resources to help your staff become proficient quickly.
Can you customize the estimates generated by the software to fit your shop’s branding?
Yes, the software allows for the customization of estimates. You can often add your shop’s logo, adjust colors, and modify templates to align with your branding.
What should you look for when choosing estimating software for your shop?
When selecting an estimating software, consider features such as ease of use, integration capabilities, customer support, customization options, and the ability to generate detailed, accurate estimates quickly.