
Your technicians inspect. But are those inspections producing revenue?
A technician performs a full inspection. They check brakes, measure tread depth, test the battery, and document fluid condition. The vehicle needs work. But when the estimate is presented, the customer approves one item. Maybe two. The rest are delayed or declined.
The problem often isn’t pricing. It’s presentation and structure. If inspections rely on loose notes, inconsistent terminology, or missing documentation, customers hesitate.
Advisors spend time translating technicians’ findings rather than guiding decisions. Recommendations get separated from the estimate. Revenue stalls.
This is where digital vehicle inspection software changes the outcome. When inspections follow a defined structure, they begin to feel like decisions.
In this guide, you’ll see exactly how automotive digital inspection software works inside the repair order. And how each configuration choice directly impacts approval rates and revenue.
Step 1: Build a Structured Inspection Template
Revenue does not start inside the repair order. It starts with how your inspection template is built inside automotive shop inspection software. A well-built template creates consistency before the vehicle even enters the bay.
1. Navigate to inspection templates
From the left panel, go to Lists and select Inspection Templates. This is your auto repair digital inspection control center.
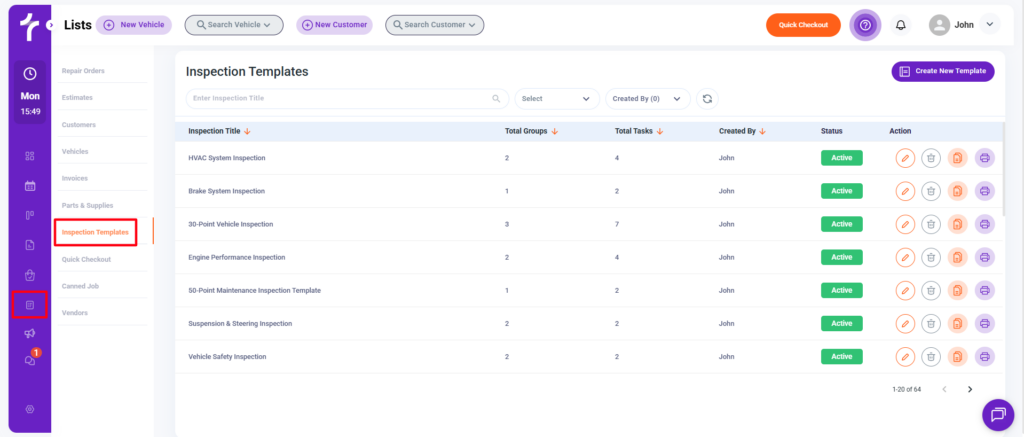
From here, you can:
- View all existing templates
- See how many groups and tasks each template contains
- Monitor template status
- Edit, print, or delete templates
If inspections drive approvals, this is where you control the process.
2. Choose a simple or an advanced template
Click Create New Template. You’ll see two options:
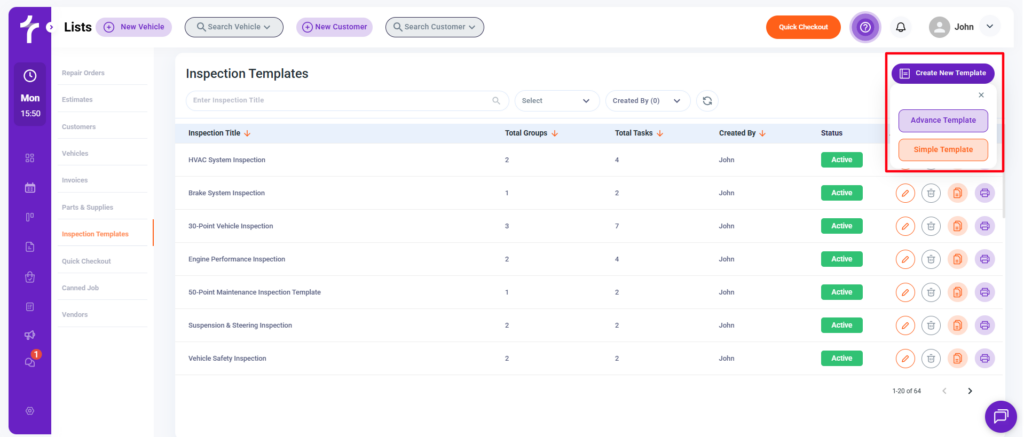
a) Simple Template
For shops that want a familiar digital vehicle inspection services layout without deeper configuration.

b) Advanced Template
Designed for full control. It allows you to configure task behavior and enforce documentation. Also, structure findings and automate job mapping.
If your goal is higher approval rates and a tighter inspection-to-estimate connection, the Advanced Template gives you that control.
3. Define the inspection title
Enter the Inspection Title. This is the template that will load inside the repair order.
Use naming that reflects the service type, such as:
- Courtesy Inspection
- Pre-Purchase Inspection
- 30K Service Inspection

Clear naming ensures advisors select the correct inspection every time. Once the title is defined in vehicle inspections software, you’re ready to build the structure.
Step 2: Structure the Inspection with Groups and Tasks
The next step is building the structure that technicians will follow during execution. Structure determines consistency. If groups and tasks are clearly defined, inspections stay uniform across every technician.
1. Add and organize inspection groups
Click Add New Group. Groups represent major inspection sections such as:
- Engine
- Brakes
- Suspension
- Electrical
- Interior

Each group acts as a container for related tasks. If you already have predefined group structures, you can reuse them by selecting a Group Template. Search for an existing group or click the Plus icon to add.
This prevents rebuilding the same inspection structure repeatedly. It also keeps your auto shop inspection software process standardized.
If you want to enforce accountability, enable Mandatory Group. The inspection cannot be marked complete unless that group is addressed. This ensures no major system is skipped.
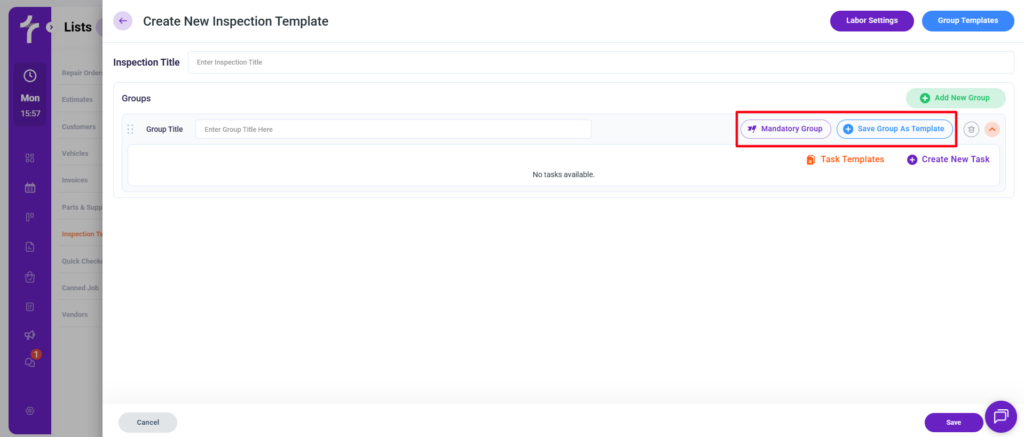
You can also click Save Group as Template after completing the template to reuse that structure in future inspections.
2. Add tasks inside each group
Inside every group, click Create New Task to define what technicians must inspect. You can also reuse predefined tasks by selecting from Task Templates in your centralized task library. Search, select, and save.
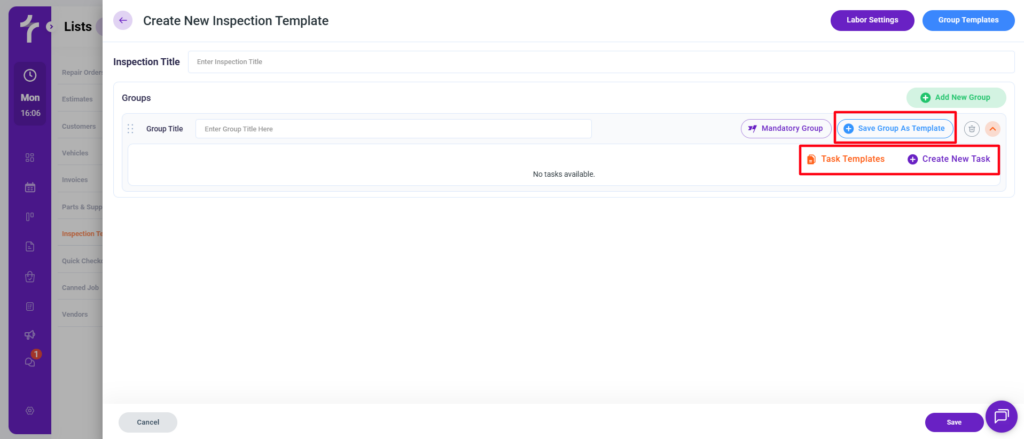
To save time later, click Save Task as Template after completing the template. This allows you to reuse standardized tasks across future inspection templates.
Groups create the framework. Tasks define the actual inspection work. Once groups and tasks are structured, the next step is configuring how each task behaves inside the repair order.
Step 3: Configure Task Behavior and Enforcement Rules
Now your groups and tasks are in place inside the commercial vehicle inspection software. The next step is defining how each task behaves during the inspection.
This is where inspections move from simple checklists to structured decision tools. Task-level configuration determines what technicians must do. Also, what they can select, and how findings connect to revenue.
1. Activate task-level toggles
Each task requires:
- Task Title
- Category
- Technician Notes
The Technician Notes guide how the task should be evaluated. This reduces inconsistency and improves documentation quality.
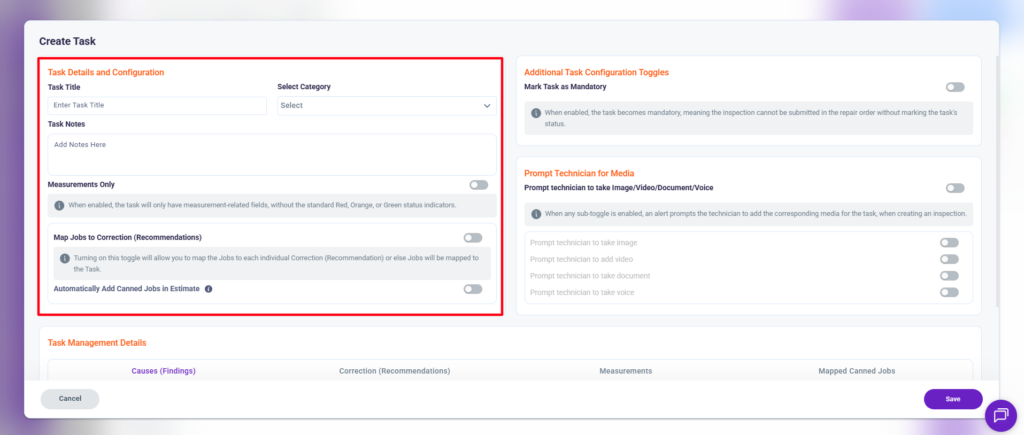
Inside each task, you’ll see several toggles. Each one controls how that task functions inside the repair order.
a) Measurement Only
When enabled, the task no longer uses green, orange, or red condition ratings during inspection. Instead, it requires numeric or structured input through the Measurements tab. This is ideal for items like brake thickness or battery voltage.
b) Map Jobs to Correction (Recommendations)
This links specific corrections to predefined canned jobs. When a technician selects a correction, it connects directly to a structured service. It’s done with preset labor and pricing.
c) Automatically Add Canned Jobs in Estimate
When enabled, mapped canned jobs are automatically added to the estimate. It works if the condition is marked red or orange. This keeps recommendations connected to revenue without duplicate entry.
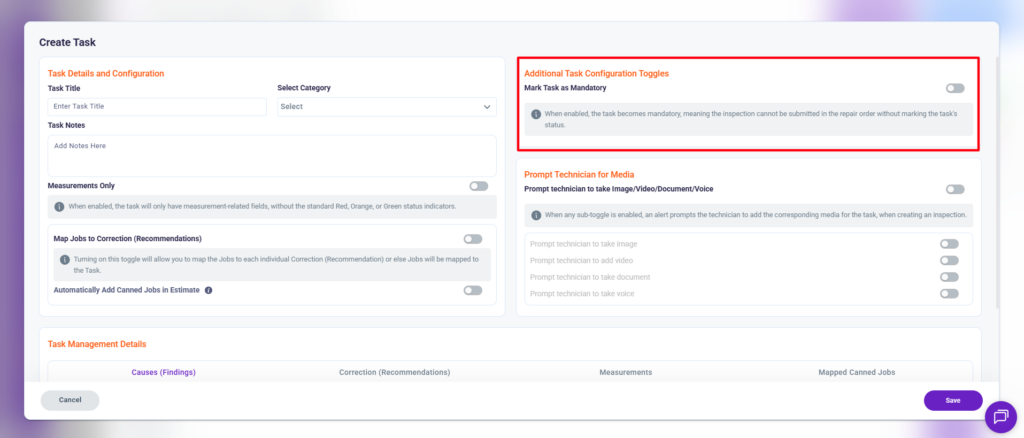
d) Mark Task as Mandatory
This toggle prevents technicians from skipping the task.
e) Prompt Technician for Media
Requires technicians to upload images, videos, documents, or voice notes. It has to be done before completing the task. If enabled, the task cannot be marked complete without documentation.
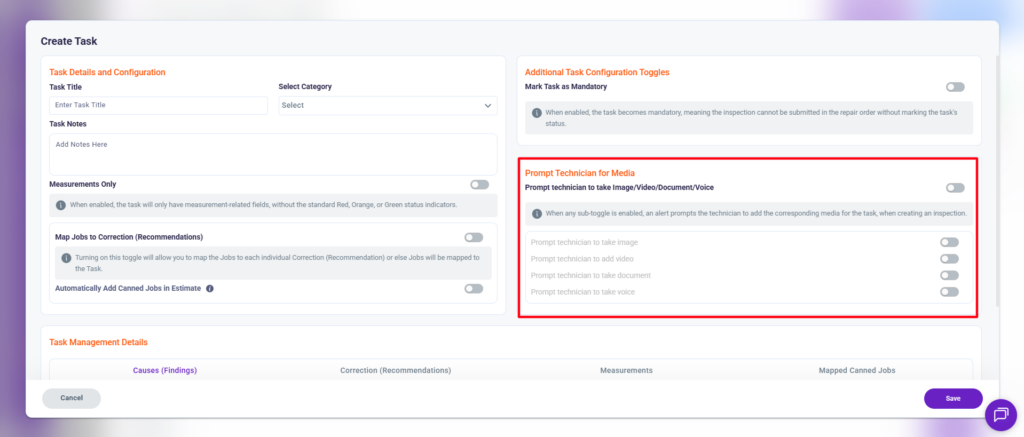
These controls enforce accountability and consistency across every inspection in digital inspection software.
2. Configure causes and corrections (triple C framework)
Scroll to Task Management Details.
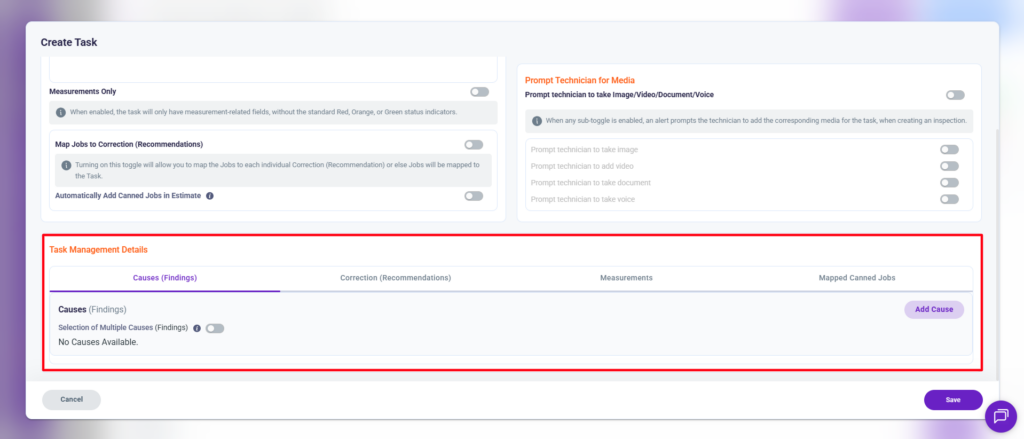
Under the Causes (Findings) tab, define the selectable issues technicians can choose from. You can enable the selection of multiple causes if needed and arrange them using drag and drop. Click Add Causes to add one or more causes.
Next, configure the Corrections (Recommendations) tab. These represent the actions required to resolve the issue. You can allow multiple corrections if applicable. Drag and drop to arrange them. Click Add Corrections to add one or more causes.
Next up is the Measurements tab, which is discussed below in point 3.
Lastly, in the Mapped Canned Jobs tab, you can attach a specific canned job(s) to each task. Search for the predefined canned job in the search bar and click to add.
This structure supports consistency inside your auto repair inspection software. It reduces advisor interpretation errors.
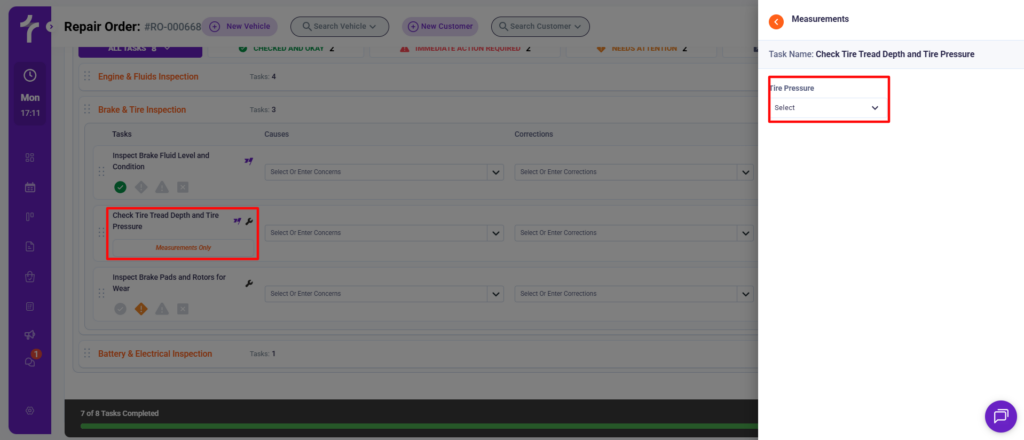
3. Add structured measurements
Open the Measurements tab and click Create New Measurement.
Define:
- Measurement Title
- Input Type (Text or predefined Values)
- Placeholder
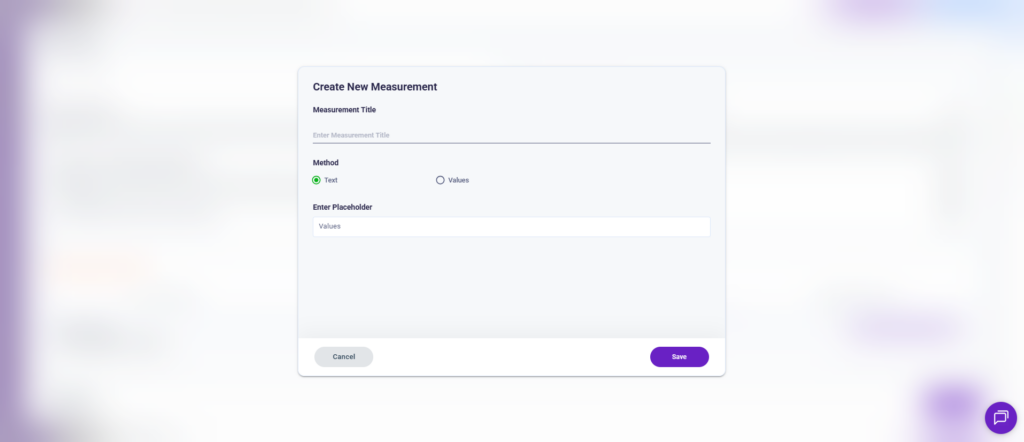
Once saved, these structured fields appear during inspection when Measurement Only is enabled. Values entered here are saved automatically during execution.
Measurement configuration is essential for data accuracy. Especially for inspections that rely on numeric evaluation.
Understand Task-Level vs Correction-Level Job Mapping
There are two ways to connect services to inspection in the automotive workshop inspection system.
a) Map Jobs to Correction (Recommendations) Toggle
Correction-level mapping connects individual corrections (recommendations) to a specific canned job.
b) Mapped Canned Jobs Tab (Task-Level Mapping)
Task-level mapping attaches a service to the overall task condition, separate from corrections.
This distinction matters. Both options ensure inspection findings stay connected to revenue opportunities.
Once task behavior, causes, corrections, measurements, and job mapping are configured, click Save. Your inspection template is now structured and ready to be used inside the repair order.
Step 4: Perform the Inspection Inside the Repair Order
Once your template is saved, the inspection moves from configuration to execution. This is where structure turns into action.
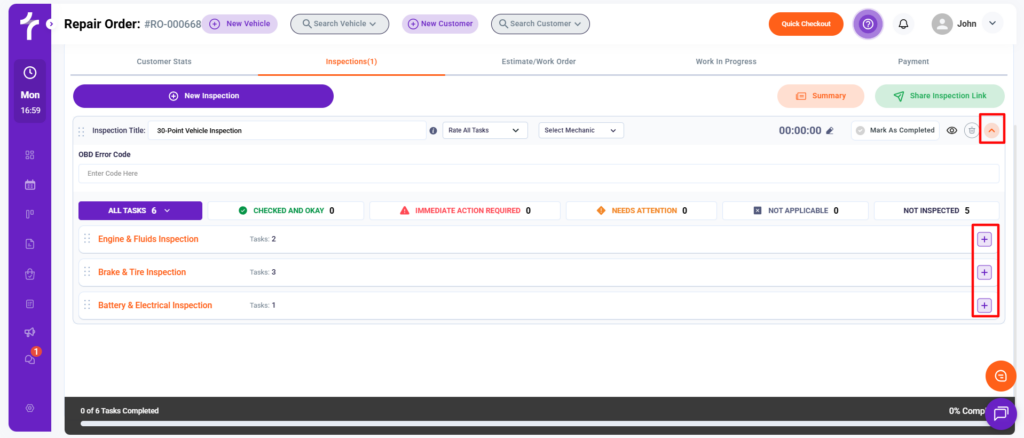
1. Open the repair order and load the inspection
From the left panel, go to Lists and select Repair Order.
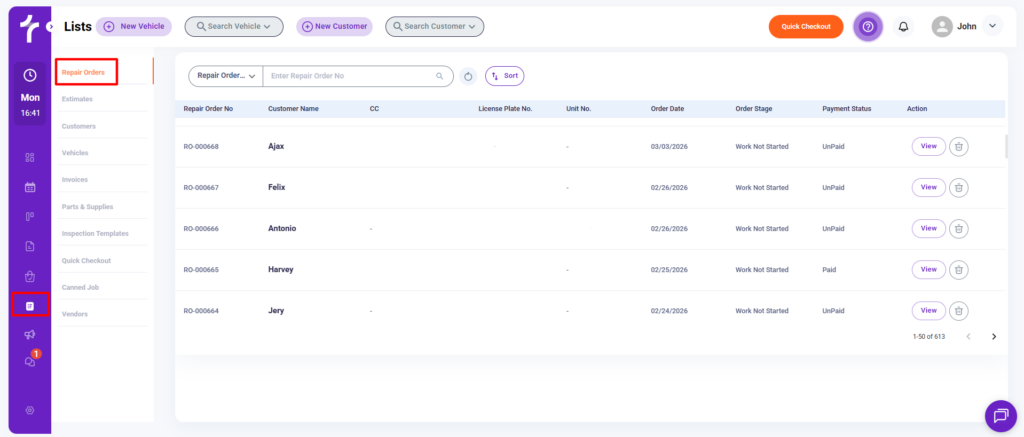
Open the repair order where the inspection needs to be performed. Navigate to the Inspections tab and click New Inspection. Your saved templates will load instantly.
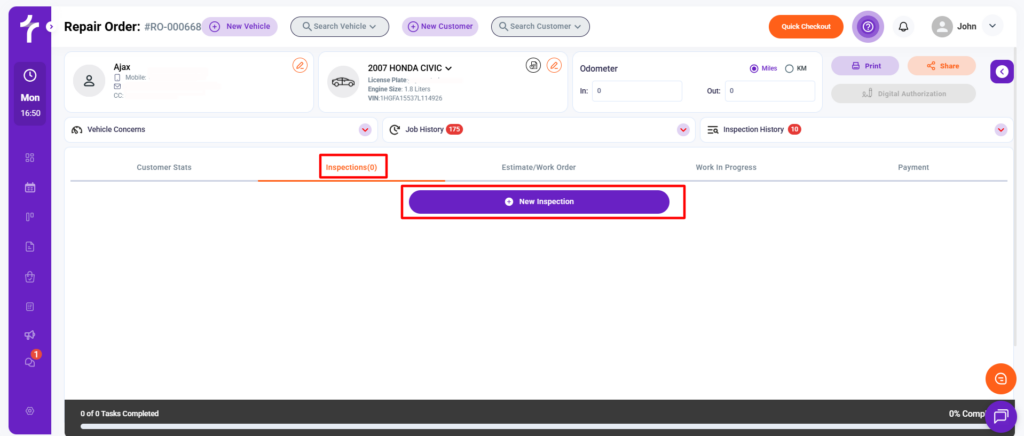
Select the appropriate inspection template and assign the mechanic. The inspection now follows the exact structure you configured earlier.
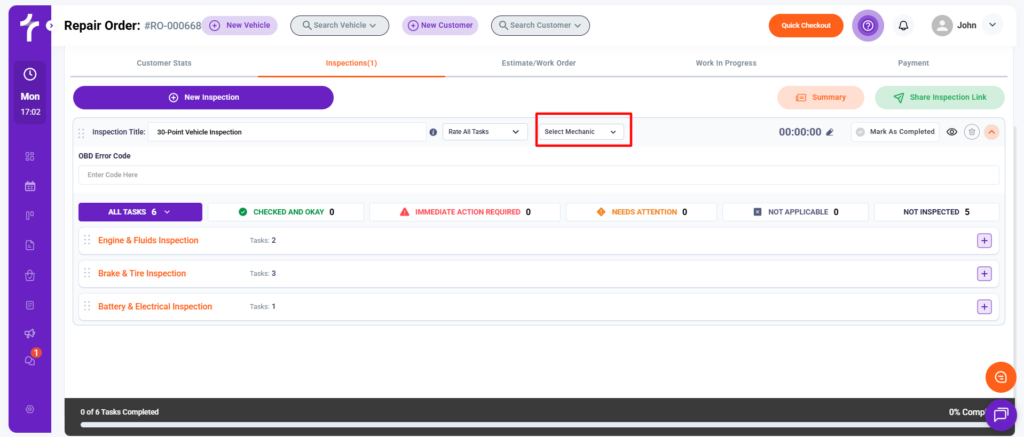
2. Expand groups and view tasks
Click the arrow to expand its details. Inside each group, click the Plus icon to view tasks. You can also drag and drop to arrange the tasks within a group.
You can filter tasks using:
- All Tasks
- Measurements Only
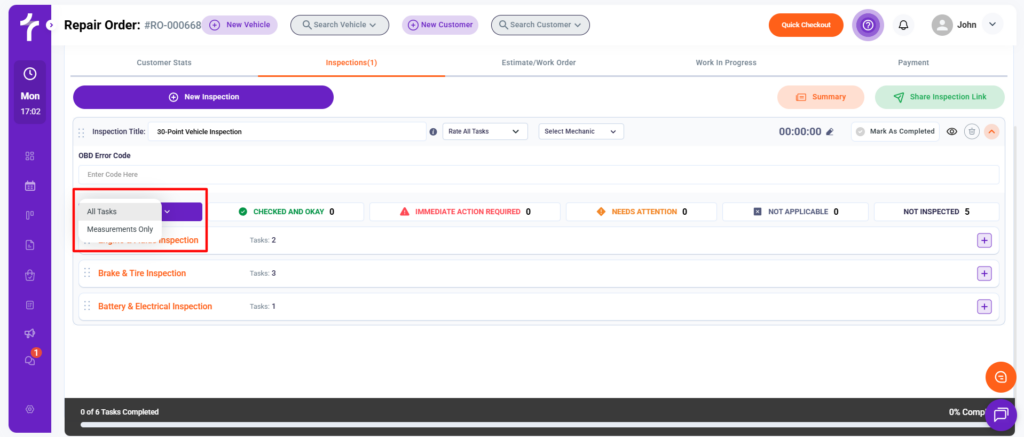
Selecting Measurements Only displays only the tasks that require numeric input. This helps technicians focus on structured data entry without scanning through condition-based items.
This filtering improves speed and accuracy during the inspection process.
3. Assign condition ratings
For standard tasks, technicians use color-coded indicators:
- Green – Okay
- Orange – Needs attention
- Red – Immediate action required
- Grey – Not applicable
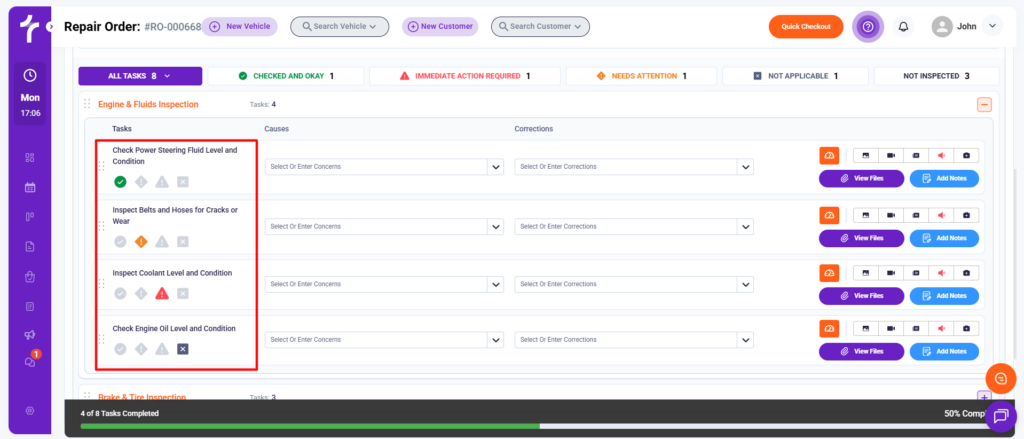
These ratings create visual priority and feed into summary and concern views later.
For measurement-only tasks, technicians select numeric values instead of selecting condition colors. These values are saved automatically.
4. Select causes and corrections
After assigning a condition rating, open the Causes field. Select the predefined cause or multiple causes if enabled in the template.
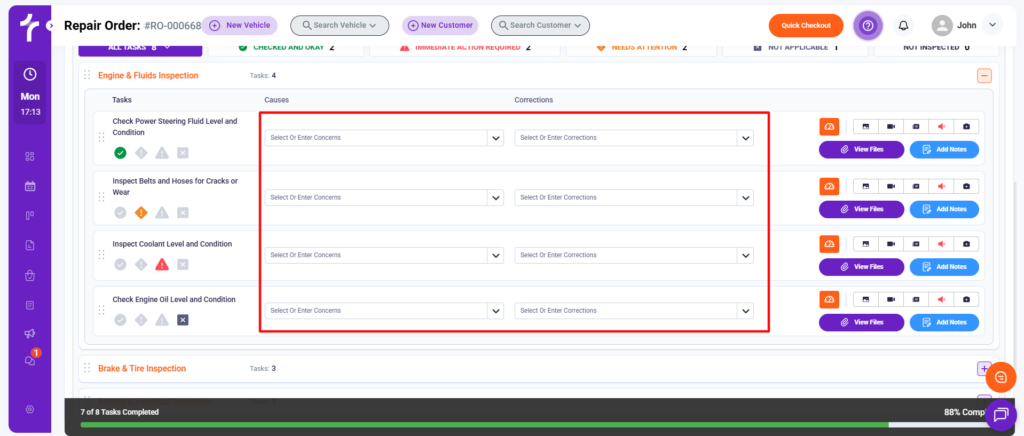
Next, open the Corrections dropdown. Choose the appropriate recommendation. If corrections are mapped to canned jobs, they are now connected to structured services in the estimate workflow.
This keeps inspection findings aligned with revenue actions.
5. Add media and notes
On the right side of each task, media icons allow uploads of:
- Images
- Videos
- Documents
- Voice notes
If media is configured as mandatory in the template, the technician must upload documentation before completing the task.
You can edit an image inside the repair order. You can also move the image from one task to another, in case you uploaded the wrong image in any task.
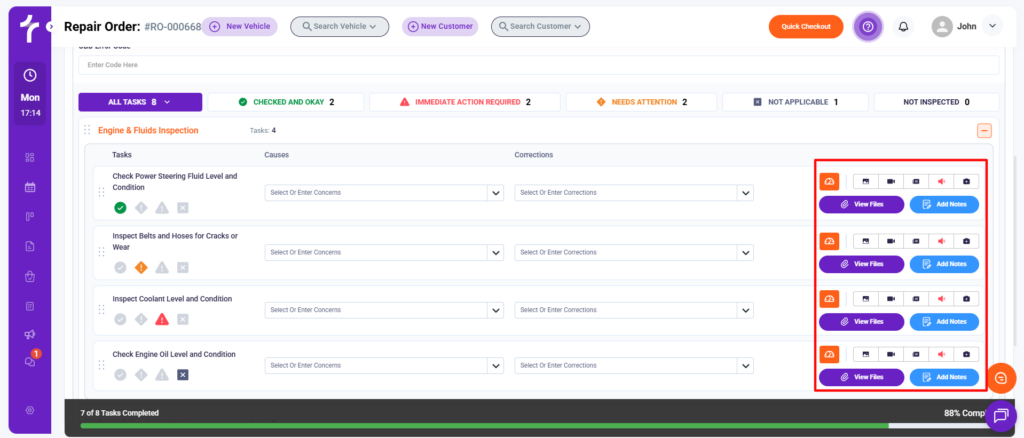
You can also add:
- Internal Notes (visible to technicians and advisors)
- Customer Notes (visible in the shared inspection)
This separation keeps internal communication clean while presenting clear information to customers.
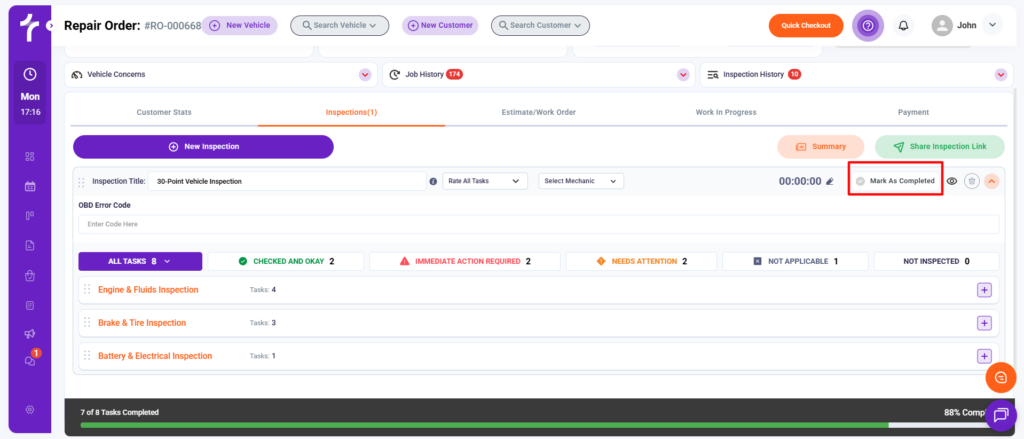
5. Complete the inspection and notify the service writer
Once all tasks are addressed, click Mark as Complete.
Enable Notify Service Writer, select the Notification Method, and Save.
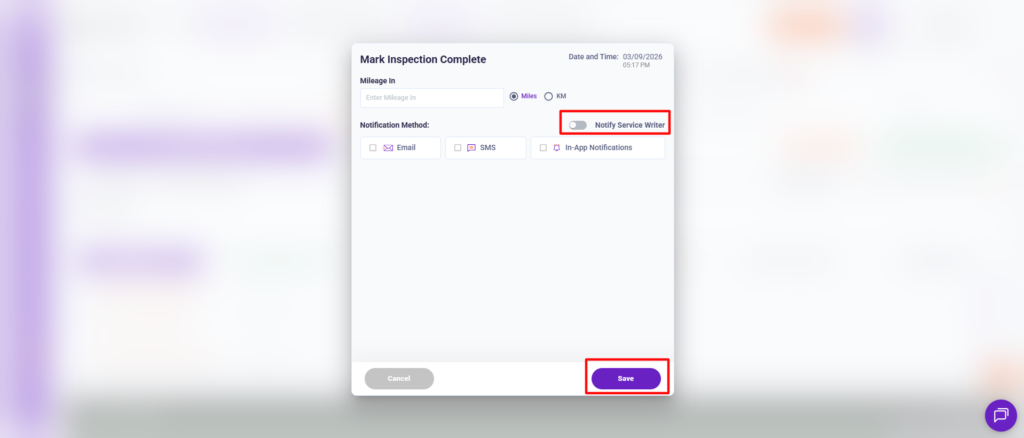
This keeps workflow communication structured. It reduces delays between inspection completion and estimate presentation.
The next step is reviewing findings and presenting them to the customer.
Step 5: Review and Share with the Customer
Upon marking the inspection complete, the focus shifts from execution to presentation. This is where inspection data becomes a sales conversation.
1. Review vehicle concerns
Inside the repair order, open Vehicle Concerns. This section automatically displays all Red and Orange tasks. These are the items that require customer attention.
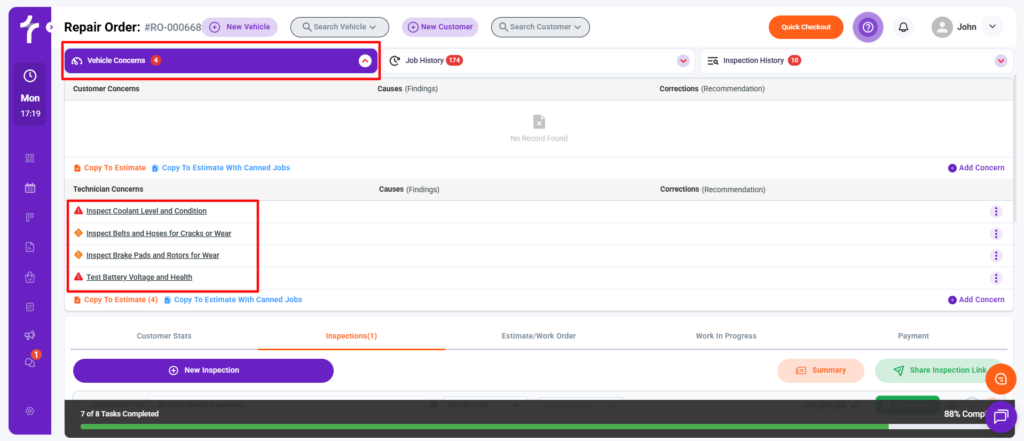
Instead of scanning the entire inspection, advisors can focus immediately on priority findings. This reduces review time and keeps the conversation structured.
You can also take action from this screen. It ensures no urgent recommendation gets overlooked.
2. Summary panel for clear prioritization
The Summary panel organizes the inspection by condition category.
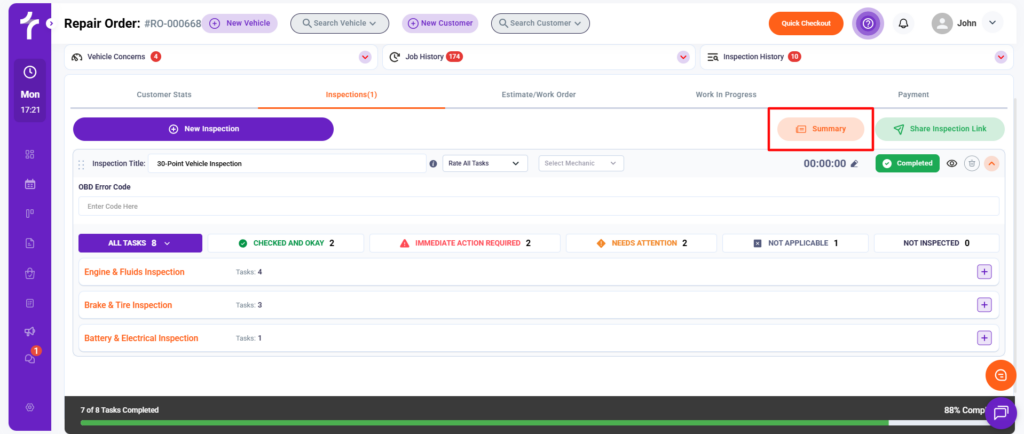
It visually groups:
- Items that are okay
- Items that need attention
- Items that require immediate action
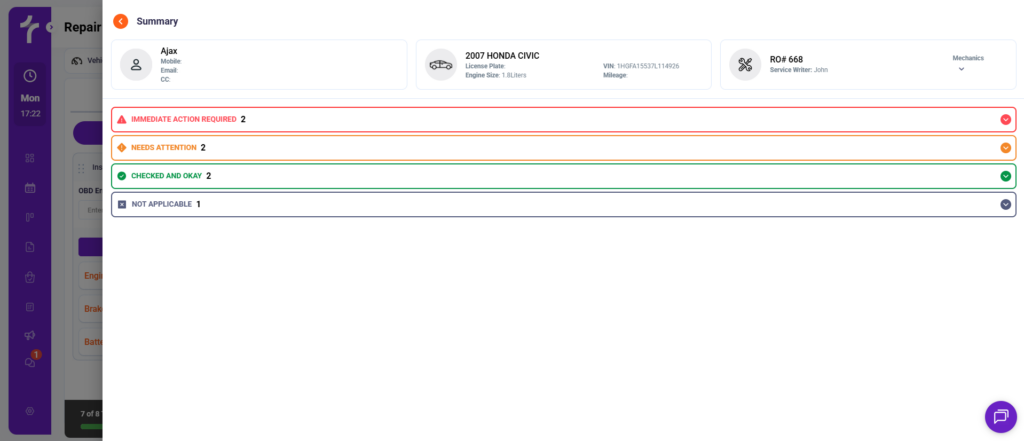
This layout makes it easier to guide customers through the inspection logically. Clarity improves confidence. Confidence improves approval rates.
3. Understand how jobs flow into the estimate
If corrections were mapped to canned jobs during template setup, those services are now connected to the inspection findings.
If Automatically Add Canned Jobs in Estimate was enabled, mapped jobs will populate the estimate when conditions are marked red or orange.
This prevents:
- Re-entering services manually
- Forgetting recommended repairs
- Advisor interpretation errors
Every documented issue remains linked to a defined correction and a structured service. This connection is what turns an inspection into measurable revenue.
4. Customize and share the inspection
When ready to present, click Share Inspection Link.
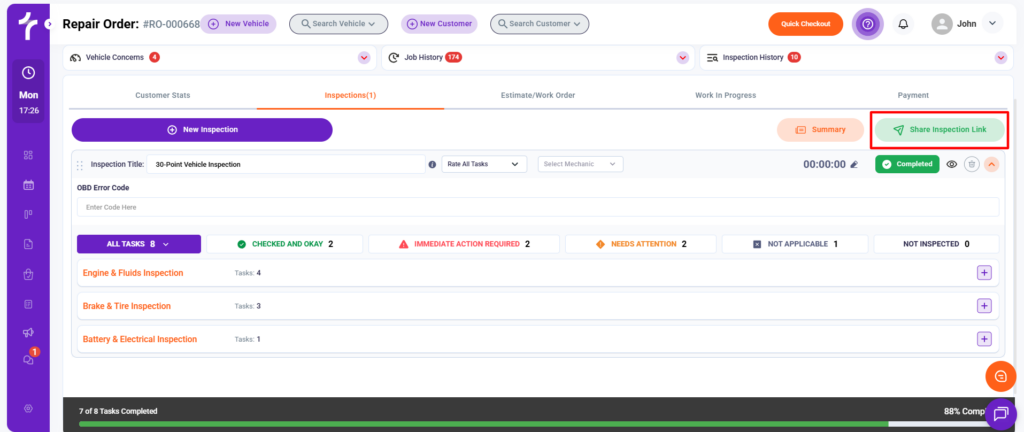
Choose the delivery method:
Before sending, click Customization to control what appears in the shared inspection. You decide which information the customer sees.
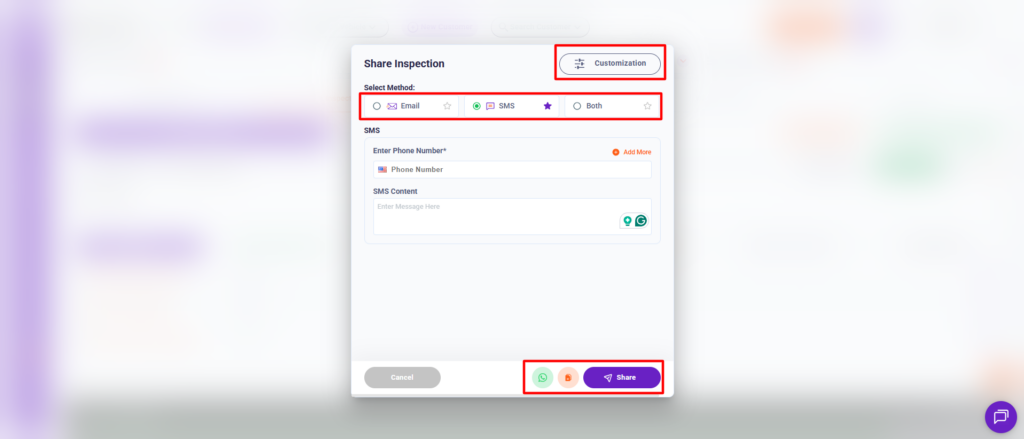
Click on Save, Copy, or share via WhatsApp.
Once shared, the customer receives a mobile-friendly inspection link showing:
- Condition ratings
- Media documentation
- Causes
- Corrections
- Customer-facing notes
When customers see visual proof and structured recommendations, decisions become easier.
From template creation to estimate, every step supports clarity. And when inspections are clear, revenue follows.
Turn Every Inspection into a Revenue Opportunity
You’ve seen how the best digital vehicle inspection software works.
It starts with a structured template. It continues with defined groups and enforceable tasks. It relies on standardized causes, mapped corrections, and required documentation.
It connects findings directly to canned jobs inside the repair order. Nothing is left to interpretation. Nothing depends on memory.
When inspections follow this level of structure, advisors present recommendations with clarity. Customers see proof. Estimates stay aligned with technician findings.
That is how digital vehicle inspection software turns inspections into revenue.
Frequently Asked Questions
How does digital vehicle inspection software improve customer approval rates?
Approval rates improve when inspections are structured, documented, and clearly prioritized. When technicians select causes and attach media, the findings remain clear and consistent. When corrections connect directly to services, advisors no longer reinterpret notes. Customers see organized findings instead of vague comments. It builds confidence in the recommendation.
What is the difference between mapping corrections and mapping canned jobs?
Correction-level mapping links a specific recommendation to a specific canned job. This means each selected correction connects to a defined service. Task-level mapping is found under the Mapped Canned Jobs tab. It attaches a canned job to the entire task instead of an individual correction.
Can technicians be required to upload photos or videos during an inspection?
Yes. Media requirements can be enforced at the task level. If Prompt Technician for Media is enabled, the task cannot be marked complete without uploading the required documentation. This ensures consistent proof for findings and improves transparency with customers.
How do measurement-only tasks work during an inspection?
When Measurement Only is enabled, the task does not display condition colors. Instead, technicians must enter structured numeric data through predefined fields. These values are saved automatically during the inspection.
Does digital vehicle inspection software integrate directly with the repair order and estimate?
Yes. Inspections are performed directly inside the repair order. If corrections are mapped to canned jobs and automatic addition is enabled, selected recommendations can populate the estimate without re-entry. This keeps inspection findings aligned with pricing and reduces workflow delays.